
Clinical Exercise: External Ventricular Drain
Scenario:
A patient presents with steadily worsening conditions of headaches and nausea. This has been accompanied by irritability and drowsiness. Recently the patient presented in the emergency room, experiencing difficulty focusing their eyes as well as difficulty in walking. A CT scan is performed showing expanded ventricles that have elevated intracranial pressure.
Diagnosis:
The expansion of the ventricles is a classic indication of hydrocephalus which is also raising intracranial pressure causing the neurologic symptoms.
Mechanism:
Intracranial pressure is tightly regulated by homeostatic feedback mechanisms consisting of the production, circulation, and removal of cerebrospinal fluid bathing the brain. A problem in either the production or elimination of cerebrospinal fluid can cause the ventricular spaces inside the brain to expand from the pressure resulting in hydrocephalus.
This can be a life-threatening condition and, as an acute treatment, excess cerebrospinal fluid must be drained out from the lateral ventricles of the brain using an external ventricular drain (EVD). The goal of this procedure is to insert a tube into the lateral ventricle to serve as a pressure release 'valve' to drain fluid from the lateral ventricle while the underlying condition is managed.
Treatment (perform these steps on the donor in a mock-procedure):
PREPARATION: Send a member of your team to the instrument supply tables to fetch one of the external ventricular drain (EVD) tubes and one of the purple surgical markers. Take just one EVD tube so that there are enough for all the tables.
Two members of the team should perform the external ventricular drain (EVD) insertion first on one hemisphere, then the other two members of the team perform the procedure on the other hemisphere.
EVD tubing is highly flexible. In order to maintain rigidity during insertion there is a guide wire inserted the length of the tubing. Clinically, an EVD tube has a closed end tip with small openings along the sides compared to our simulated tubing which has an open end.
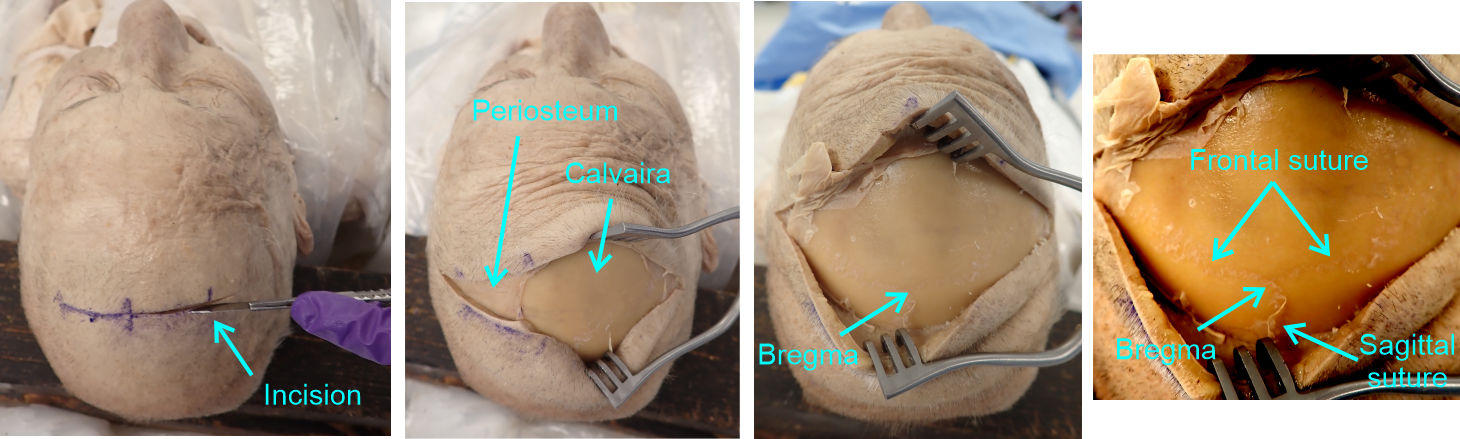
1) Identify a point 3cm lateral to the midline (which is the mid-pupillary line) and in line with the tragus of the ears (this is approximately an 11cm curve starting at the glabella following the skin surface).
This location is often called Kocher's point and is a common initial incision location for the EVD. In a living and our donors, the patient's hair will have been shaved away from the incision point and the skin surface disinfected prior to making the incision.
2) Make a 6-8cm lateral incision to the bone of the calvaria starting at the midline and extending laterally on each side through Kocher's point (which should put the midline at approximately the middle of a 12-15cm incision).
This is a larger incision than would typically be used surgically, however it is never wrong to make a larger incision than necessary in an emergency procedure to ensure that you have adequate room to work and the larger incision here will allow us to more easily visualize the sutures of the skull.
3) Use a Weitlaner retractor to spread the incision widely.
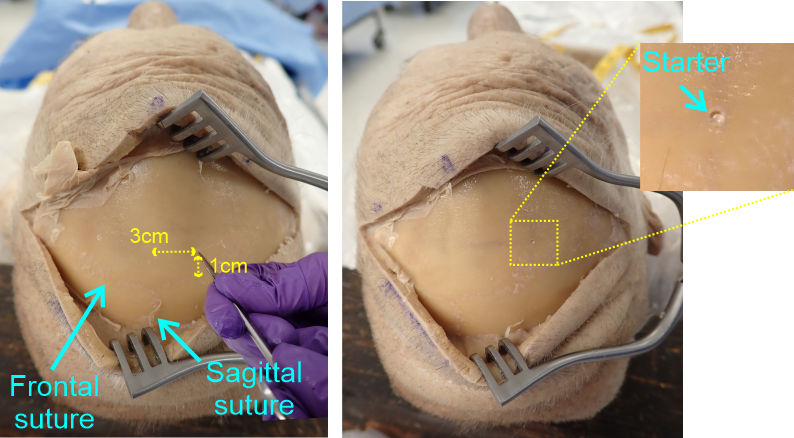
4) Peel back the periosteum covering the calvaria so that you can identify the frontal suture, sagittal suture, and bregma landmarks on the calvaria.
The periosteum tightly adheres to the bone and you may need to use a scalpel to cut and lift or scrape the periosteum. The suture lines in the living and our donor are more difficult to visualize than on the dry skull you examined. The dehydration and preparation process of a dry skull makes the sutures more distinct. On the donor look carefully for slight coloration changes and points where the periosteum strongly adheres, as the periosteum binds closely to the suture lines.
5) Measure and mark with a point on the calvaria that is 3cm lateral to bregma (i.e. 3cm from the midline) and 1cm anterior to the frontal suture.
6) Place the closed tips of a pair of sharp point scissors against the bone of the skull at your marked point and press firmly against the bone while rotating the scissors rapidly in a back-forth screwing motion to cut (i.e. hand drill) a small depression into the bone surface.
You only need to hand-drill a small depression in the bone (~0.5-1mm deep) as a starter hole to keep the power drill bit from slipping when you start the drill hole below. Craniotomy drill bits have sharp point tapping guides to help control against 'skipping' of the drill bit as the hole is started, but commonly a hand-scored starter hole is made in bones using a specialist tapping tool for precision.
7) Switch the Stryker saw cutting head for the drill head
To change the power cutter head, press in the indented tabs on each side of the base of the cutting head and then pull the main handle part of the tool, separating the cutting head from the handle. Then place the drill head onto the handle and push in until the tabs on each side engage. The batteries are all on charging stands at the front and rear supply tables in the lab.

8) Insert the drill bit (located in your other tools box or already present on the drill head, spare drill bits are available at the supply table if they are missing from your kit) leaving half of the drill bit shaft protruding from the drill head clamp.
9) Position the drill bit against the starter hole angling the drill laterally so that in the coronal plane you are aiming at the midline at eye level and then tilt the drill bit anteriorly such that in the sagittal plane you are aiming at an imaginary line spanning from the external auditory canal of one ear to the other.

10) Using the drill (slow-ish speed) make a burr hole through the skull, taking care not to over-drill deep into the brain itself.
As you drill, at times remove the drill bit from the hole and press on the base of the hole with a probe. If you are through the skull the probe will press on the softer dura surface compared to the inflexible bone of the calvaria.
Surgical craniotomy drill bits have retracting depth guards to prevent over-drilling into the brain. As our drills lack these guards, press gently as you advance the drill through the skull so as not to over-penetrate too far into the brain tissue itself.
The making of a hole through the skull is historically called trepanning, while excising a larger flap of bone is called a craniotomy. However, you will often find the term craniotomy in common use for any sort of opening.

12) Mark a point on the catheter 7cm from the tip, which is the approximate depth of the lateral ventricles of the average human brain.
13) Position the tip of the EVD against the dura in the center of the hole and position with the same tilt that you used for the drill hole itself (i.e. aimed at the midline in the coronal plane and at the tragus in the sagittal plane).
14) Holding the tube firmly near the tip, push the probe slowly into the hole until the marked 7cm point is at the edge of the calvaria.
15) Continue holding the tubing and pull the guide wire out from the lumen of the tubing.
This should leave the highly flexible tube connected from the lateral ventricle to the outside.
In the living, the elevated cerebrospinal fluid pressure would result in fluid coming out of the tubing. However, the absence of any intracranial pressure in the donor means that fluid will not emerge.
The tubing and opening in the calvaria are covered with sterile dressing and surgical tape to minimize infection risk while the drain is in use. However we will skip this stage in our mock procedure.

16) Remove the tubing and reinsert the guide wire such that the second member of the team may perform the insertion (you may need to lubricate the wire with a bit of wetting agent). When they have finished, the other members of the team should perform the procedure on the other hemisphere.
When complete, reassemble the external ventricular drain wire and tubing and return them to the supply table.
Outcome:
The external ventricular drain (EVD) has two major functions for this patient. Diagnosis, where the catheter is used to monitor intraventricular pressure, and treatment, where the catheter allows drainage of excess fluid out of the ventricles providing actuate relief of the neurological symptoms.
The patient is referred to neurosurgery for installation of a permanent ventricular shunt to provide long term management of the condition.