
Clinical Exercise: Femoral Vessel Exposure and Control (cut-down)
Scenario:
You have completed your medical training as a physician under a Department of Defense scholarship and have been deployed to a field trauma station in a conflict zone. A corporal is rushed into your trauma station having been injured by shrapnel from an improvised explosive device. Multiple shrapnel penetrations are present in the leg, thigh, and around the knee. A field medic had applied a tourniquet positioned around the thigh which has slowed blood loss, but there is clearly significant bleeding still occurring.
Diagnosis:
You understand that exsanguination is one of the leading causes of loss of life in trauma and that immediate control of blood loss is essential. The presence of multiple shrapnel penetrations and potentially hidden vessel injury makes control of blood loss at the site of injury unlikely to be completely successful.
You make the determination that in order to control bleeding from all of the potential injury sites in the limb you will need to gain control of the primary vessel supplying the extremity proximal to the region of injury, in this case the common femoral artery. You immediately plan to expose the common femoral artery and gain control of the vessel (i.e. the ability to constrict flow).
Mechanism:
Immediate control of bleeding is usually achieved by direct pressure over the site of injury. This pressure does not need to be great, as systolic blood pressure is only around 100mmHg, but it does need to be directly over the site of injury to be effective. In the case of this patient, there are multiple injuries and potentially shrapnel bouncing off bones in the leg injuring vessels in locations not readily apparent. The field medic made the call that a constrictive tourniquet offered the best chance of the corporal reaching your trauma center for advanced care.
The common femoral artery supplies the vast majority of blood to the lower extremities. Gaining control of the common femoral vessel will allow major blood loss from multiple or hidden vascular injury distal to that point to be managed.
Control of peripheral blood vessels is typically achieved via vessel loops, which are a fundamental tool of modern surgical approaches. Vascular clamps are sometimes used, but these need to be used carefully as excessive pressure closing the clamp will cause vessel wall damage. Vessel wall damage is less likely with the loop technique.
There are a variety of vessel loop techniques with the most typical method uses umbilical tape (flattened string, for today we'll simulate this with regular string) looped twice around the vessel and pulled snug to occlude blood flow.
An alternate vessel loop method involves the tape passed back on itself through a small length of silastic tubing (which is called the bolster). Once looped around the vessel the bolster is pushed down to squeeze the tape around the vessel. This arrangement is termed a Rummel tourniquet.
Treatment (perform these steps on the donor in a mock-procedure):
To treat this patient you need to gain access to the common femoral artery rapidly via femoral exposure (cut down). Note, one side of your donor will have an incision accessing the superficial femoral artery for embalming.
PREPARATION: Send a member of your team to the instrument supply tables to fetch one of the silicone vessel loop packets from one of the supply tables (in our case they are blue, but come in a variety of colors to help color code structures in surgery, each packet contains two loops). Also take one of the right-angle hemostats (remember to return them after the exercise).
1) Palpate to find the anterior superior iliac spine and the pubic tubercle and place a purple mark on the skin at these points along with a line connecting the two landmarks.
Identification of the correct landmarks and placement of the initial incision is a key step in peripheral vessel exposure. Incorrect incision placement makes finding the vessel more difficult and costs more time. In the case of risk of exsanguination from vascular injury speed is of essence.
2) Then place a planned incision line that is 1/3rd of the way from the pubic tubercle towards the anterior superior iliac spine with the line extending distal along the thigh angling the line such that it aims at the medial side of the knee (i.e. approximately parallel to the course of the sartorius muscle).
If your patient has significant body fat it can be difficult to accurately find the anterior superior iliac spine. If this is the case you can estimate from the pubic tubercle alone. The common femoral artery will be approximately two finger widths lateral to the pubic tubercle.

2) Directly anterior to the artery (i.e. along your marked incision line) make a longitudinal incision through the skin approximately 6-8 inches long,
It is never a mistake in trauma care to make a larger incision, the larger incision saves time and can always be sutured together later.
A common pitfall to the procedure is considering the skin crease at the groin to be the inguinal ligament (the skin crease is inferior to the actual inguinal ligament position) and making the incision too inferiorly.
3) Force your finger into the subcutaneous tissue and vigorously spread that tissue laterally and medially separating subcutaneous tissue to the level of the fascia lata.
Spreading the subcutaneous tissue can be mildly aggressive as the fascia lata layer will help protect deeper structures from harm at this time.
Utilize the skin spreaders (Weitlaner Retractor) to hold the skin spread for the next steps.
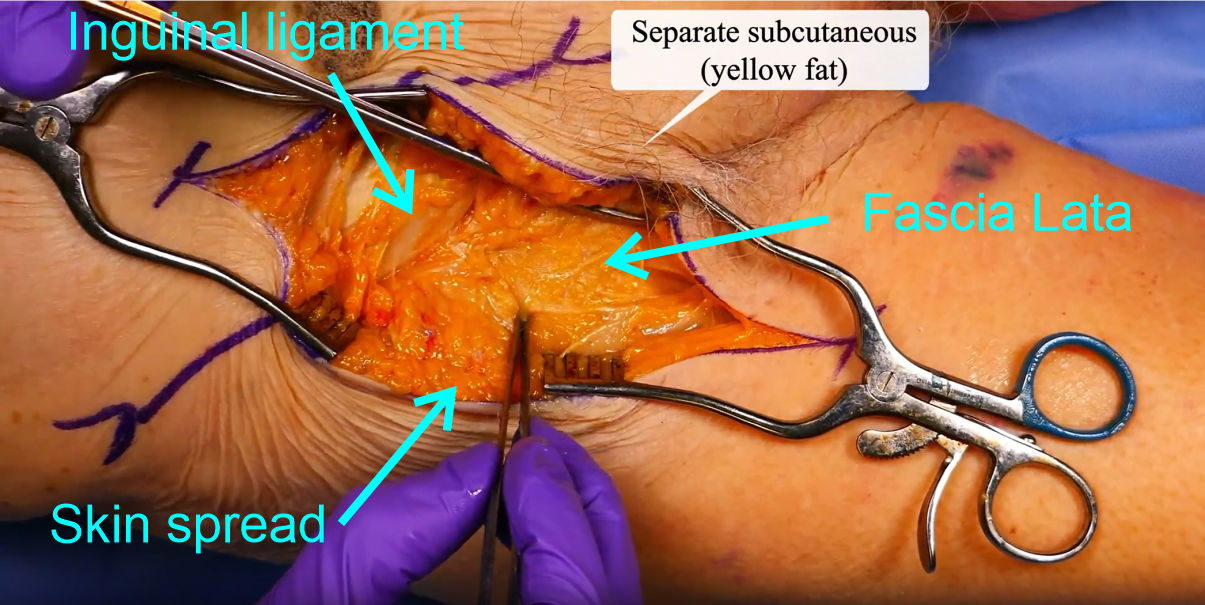
4) When you can observe the fascia lata layer (glassy white) grasp the fascia with hemostats and while lifting slit the fascia lata open along the length of the skin incision.
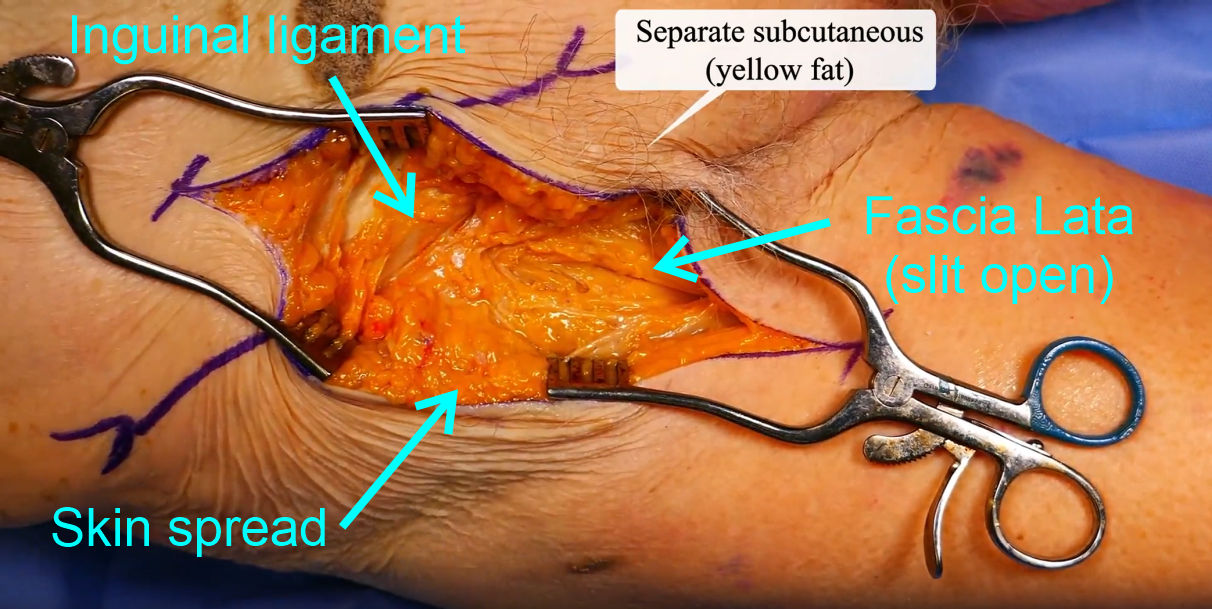
5) Push your finger firmly into the opening in the fascia lata and feel/look for the cylindrical shape of the common femoral artery.
If you have trouble finding the vessel position, return to the abdominal cavity and push a blunt probe into the femoral sheath along the anterior side of the external iliac artery. You should be able to feel the probe in your surgical opening...clearly this is not a technique you could use in a trauma patient!
Recall the position of the femoral nerve (most lateral), and then the femoral sheath containing the common femoral artery (middle) and femoral vein (most medial). In a patient with blood pressure, the pulse of the femoral artery assists identification. A common morbidity following femoral exposure involves damage to the nerve or vein from incorrect approach.
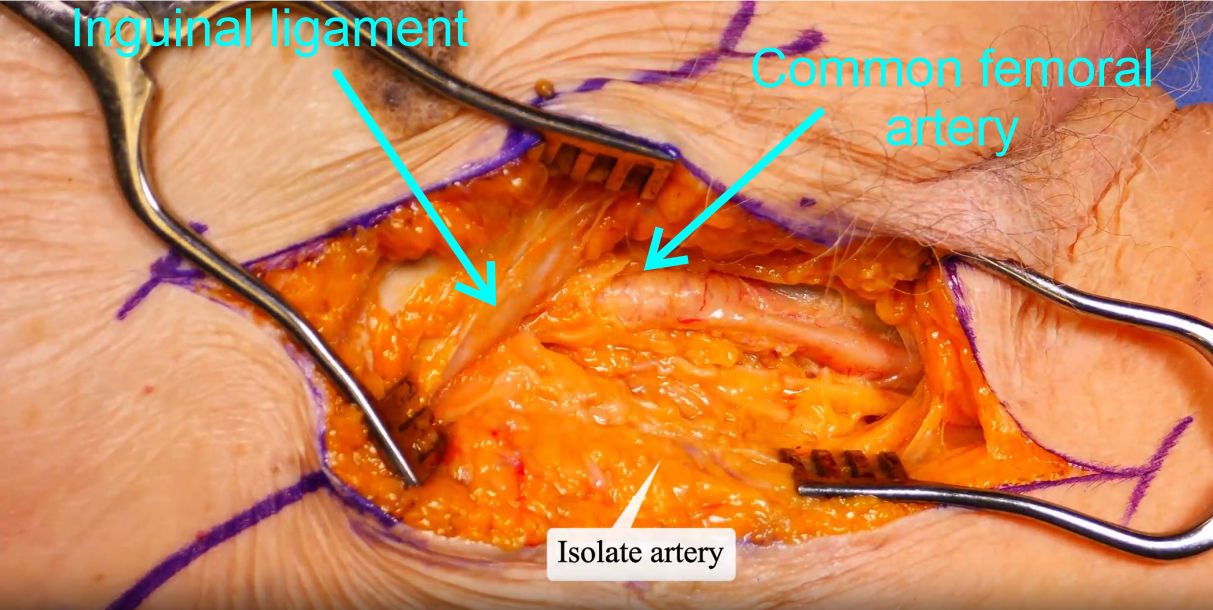
6) Using a spreading or cutting motion with scissors, slit open the femoral sheath staying on the anterior side of the femoral artery.
7) Blunt dissect (or spreader motion with scissors) to expose the anterior side first, then the medial and lateral sides avoiding damage to any artery branches.
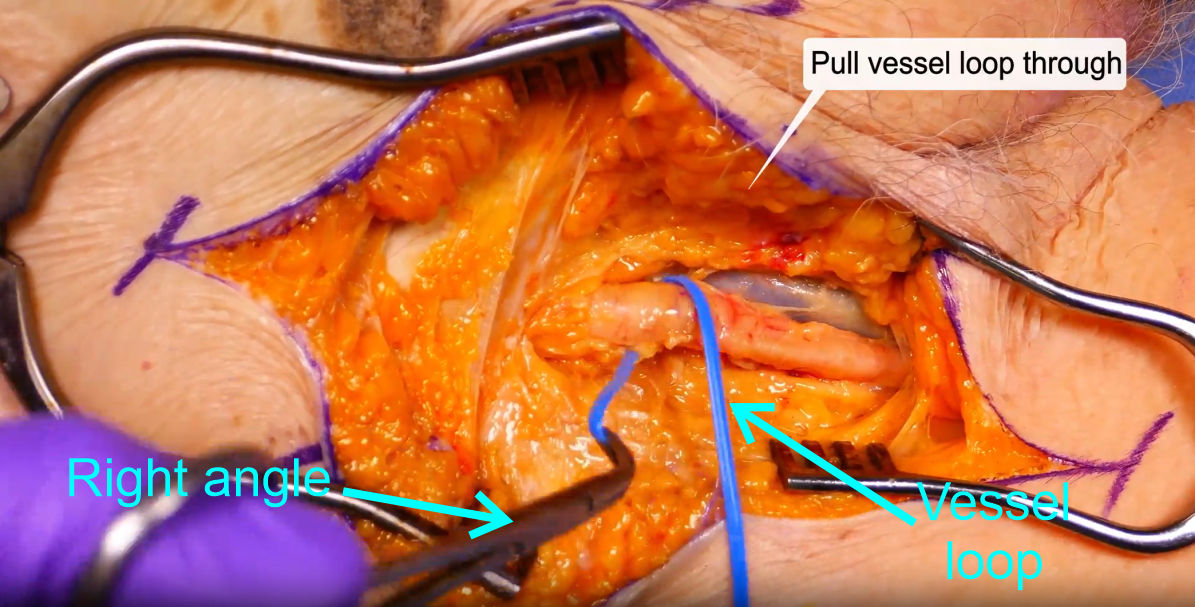
8) Using the right angle hemostat with the tips closed, slip the instrument under the common femoral artery angling such that the tips of the right angle emerge upwards on the other side of the artery.

9) Open the tips of the right angle and grasp one end of the silicone vessel loop.
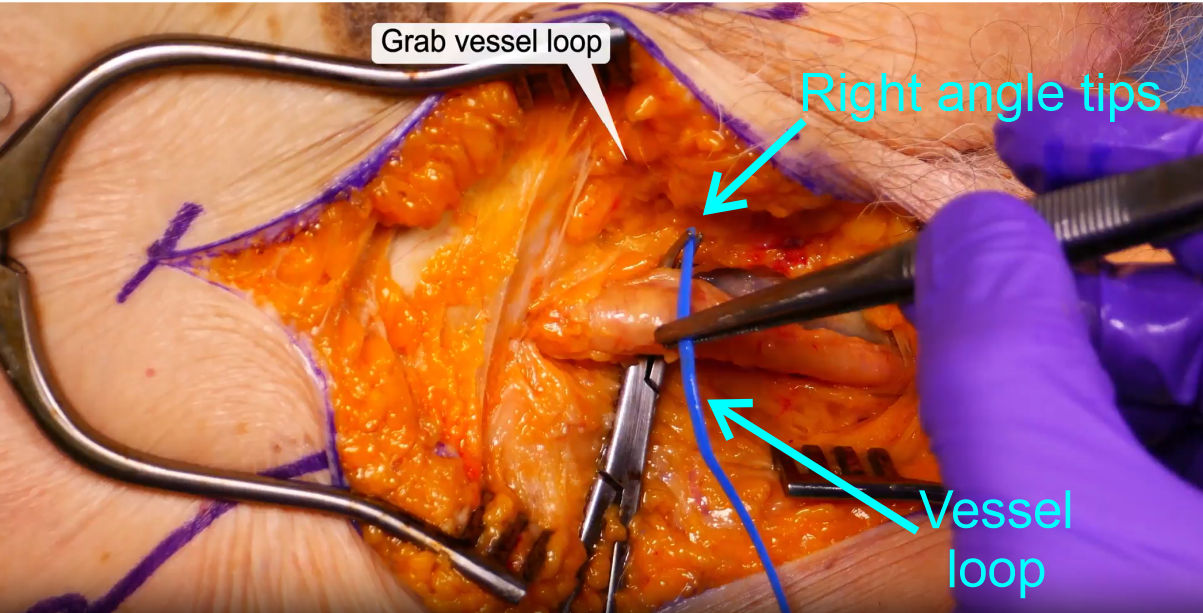
10) Pull the vessel loop under the artery to the halfway point along the length of the vessel loop.
11) Release the hemostats and insert the tips under the vessel a second time, angling the tips so that they point upwards on the other side of the vessel.
12) Grasp the same end of the vessel loop that you pulled under the artery a second time.
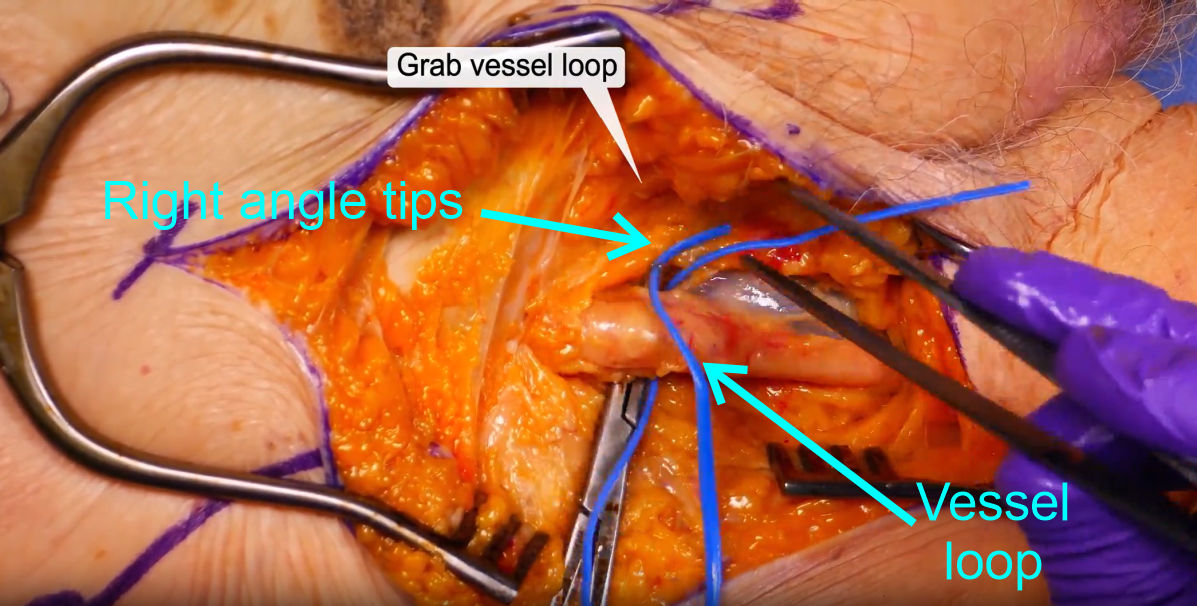
13) Pull the vessel loop under the artery so that the vessel loop is now completely encircling the artery with the two ends able to be held in your fingers.
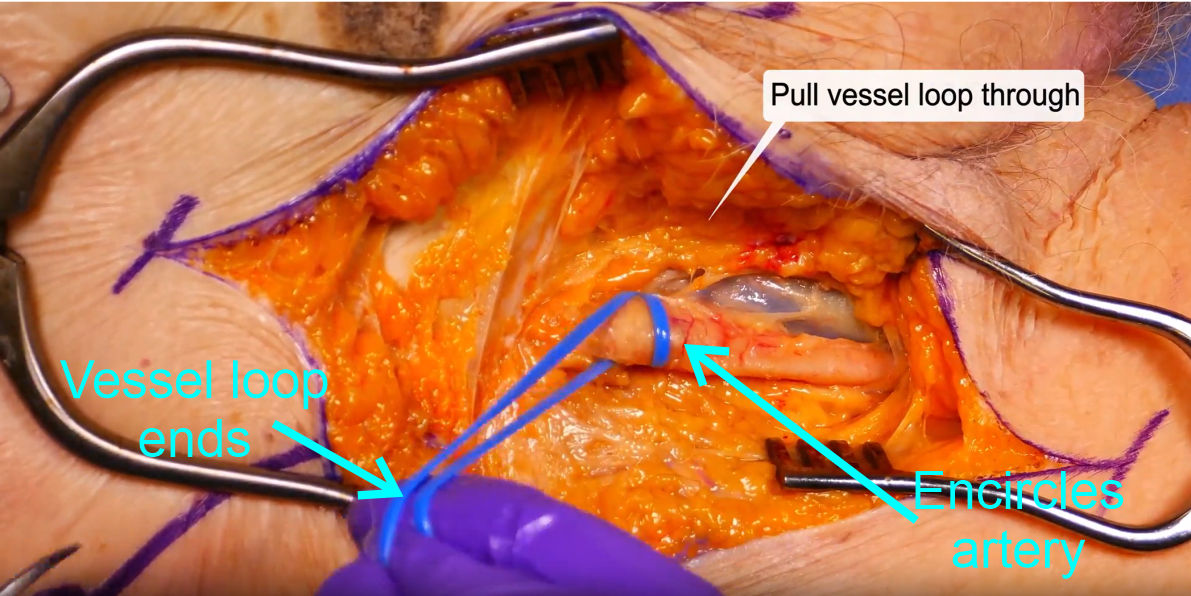
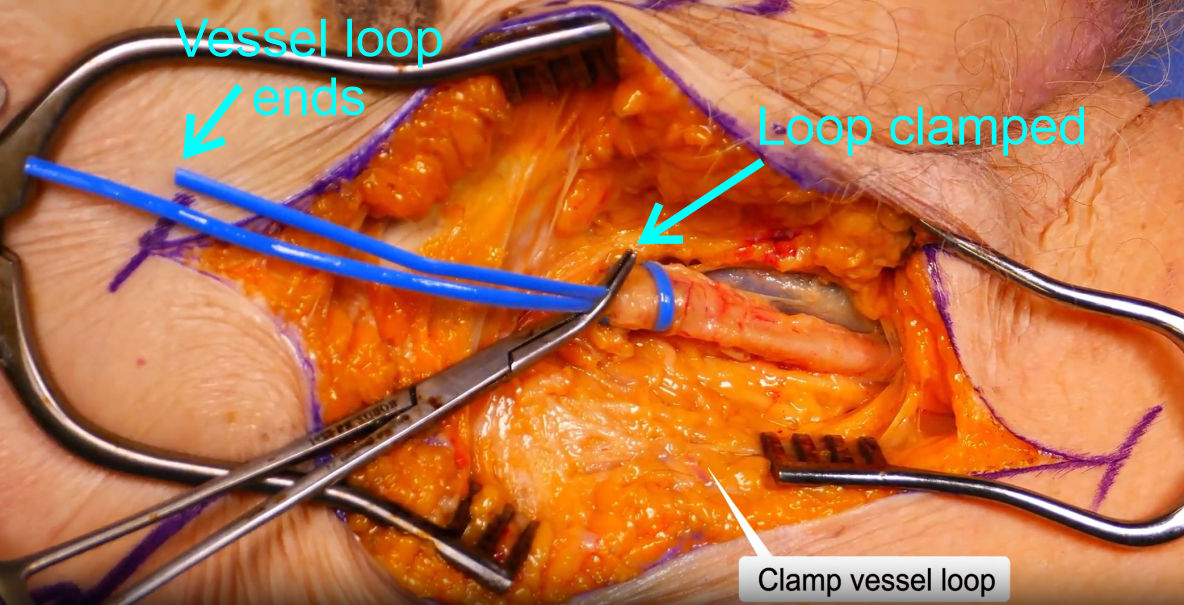
14) Pull the ends of the loop tightly which will squeeze the vessel and constrict any blood flow.
Tension can be maintained by holding the loop or using a bolster/clamp to grasp the vessel loop close to the vessel to maintain the pressure during the surgery. The loop is never tied in a knot, as a knot cannot be rapidly loosened when there is a need to restore blood flow temporarily (e.g. to test if all the broken vessels distally have been addressed).
15) When finished, remove and discard the vessel loops (regular trash) and return the right angle hemostat to the supply station at the front of the lab.
Outcome:
The vessel loop allows you to constrict blood flow through the femoral artery and stop the ongoing blood loss from the shrapnel injury sites. You put the patient on whole blood transfusion to stabilize blood pressure. With the acute blood loss concern under control, you proceed to removing the shrapnel and repairing the injury sites on the limb.