
Clinical Exercise: Malleolar Fixation
Scenario:
A patient was walking over uneven ground and had their foot slip into a hole causing them to fall twisting their ankle. The patient is unable to support their weight on that leg and you order x-rays.
Diagnosis:
The x-ray imaging shows that the patient has fractured their proximal fibula resulting in a separation of the tibia/fibula as well as separation of their distal tibiofibular joint (the tibiofibular syndesmosis). A mild injury here is called a 'high ankle sprain', but this patient has a separation.
You recognize that the broken fibula and disruption to the stabilizing ligaments of the tibiofibular joint will result in instability of the ankle and inability to bear load. You determine that the ankle will need mechanical stabilization while the ligaments and bone heal.
Mechanism:
The tibiofibular joint is a strong joint holding the tibia and fibula bones in position forming the ankle joint. This joint is held by anterior and posterior ligaments between the tibia and fibula bones at the distal tibiofibular joint, as well as by the interosseous membrane spanning between the bones along their full length.
If these stabilizing ligaments are ruptured the position of the fibula and tibia at the ankle becomes unstable and the patient is unable to bear weight on that leg. Mild injury can be treated conservatively with an ankle brace, rest, and physical therapy. More significant injury may require the fibula to be held in the correct position in relation to the tibia while the ligaments heal. In this scenario, the combination of proximal fracture of the fibula with damage to the tibiofibular ligaments is the most unstable type of injury and will require fixation.
Fixation can be achieved by insertion of one or two screws through the fibula into the tibia holding the bones in position. Depending on the injury, a metal plate may also be required. In this injury, you make the determination that two screws spanning the fibula into the tibia at the ankle will be sufficient to stabilize the ankle for healing.
Treatment (perform these steps on the donor in a mock-procedure):
PREPARATION: Send a member of your team to the instrument supply tables to fetch four bone screws and a purple skin surgical marker. Perform the procedure on both ankles, inserting two screws in each ankle, such that each member of your team has the opportunity to drill and insert one of the screws in your patient.
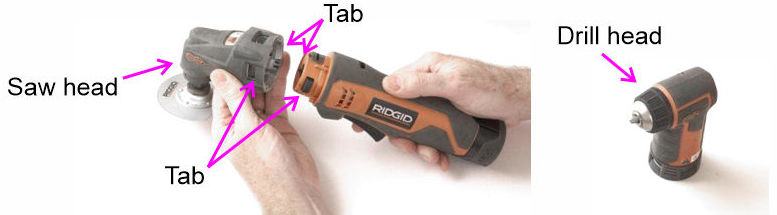
1) Switch the Stryker saw cutting head for the drill head
To change the power cutter head, press in the indented tabs on each side of the base of the cutting head and then pull the main handle part of the tool, separating the cutting head from the handle. Then place the drill head onto the handle and push in until the tabs on each side engage.
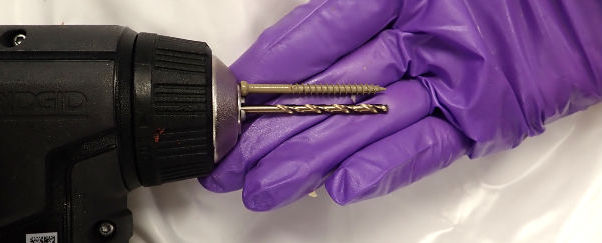
2) Insert the drill bit (from your 'other tools' box) such that the length of the drill bit matches the length of the bone screw (i.e. so you do not 'over-drill' the depth of the hole though the bone).
3) Palpate the lateral side of the ankle and draw a line outlining the lateral malleolus and distal fibula bone, then mark the planned incision line on the malleolus extending 5-8cm proximally along the skin overlaying the fibula bone.

4) Make an incision through the skin along your incision line and spread the incision widely using a Weitlaner retractor.

5) Make a longitudinal incision along the periosteum (fascia covering the bone) and peel the sheet back to expose the fibula's bony surface.

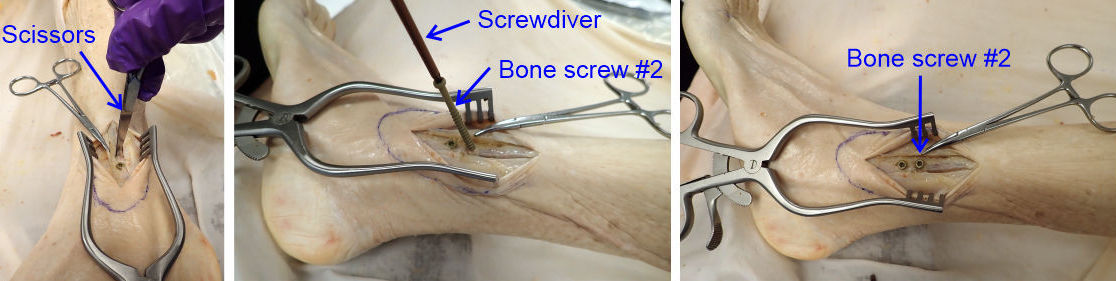
6) Place the closed tips of a pair of sharp point scissors against the bone of the fibula just proximal to the lateral malleolus at the midpoint of the fibula and press firmly against the bone while rotating the scissors in a back-forth screwing motion to cut (i.e. hand drill) a small depression into the bone surface.
You only need to make a small depression in the bone as this will keep the drill bit from slipping when you start the drill hole below.

7) Position the drill bit against the depression point and angle the shaft such that it aims in the horizontal plane directly towards the tibia.
This angle is approximately 30 degrees and can also be estimated by palpating for the position of the medial malleolus, which is the distal end of the tibia. That allows you to angle the drill bit accurately towards the middle of the tibia.
Usually for this procedure a 2mm diameter K-wire rod is inserted into the fibula and used as a lever to position the unstable fibula such that the screws are placed through the fibula into the tibia with the bones in the correct configuration. As the ankle of our donor is not actually unstable, this K-wire step is not needed.

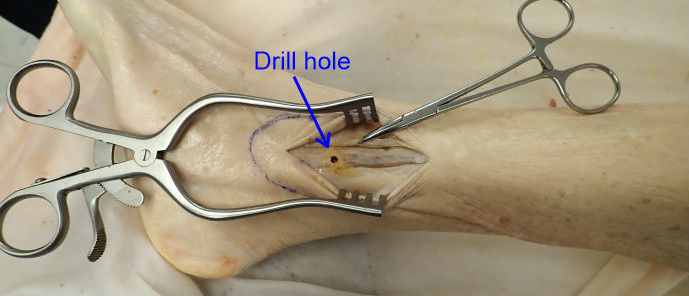
8) Drill a hole the full depth of the drill bit through the fibula and into the tibia. The length of the drill bit was previously calibrated to be the length of the screw we are using.
In practice, the length of the screws are selected to match the ankle width of the individual, so that the screw does not excessively protrude from the other side of the ankle. We are using an average length which may be a little longer or a little shorter than ideal for every donor, but are suitable for demonstrating the principle and general approach used with the procedure.
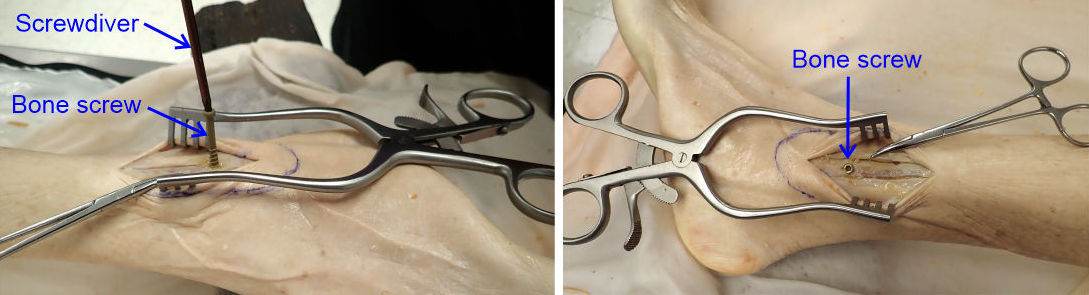
9) Position the screw angled to match the angle of the hole and using the Torx screwdriver (in the 'other tools' box) fully insert the screw.
The drill hole will tend to guide the screw into the correct angle as long as the screw is roughly aimed along the hole axis. The bone screw should be tightened to be 'snug' against the fibula bone, but not over-tightened as this can result in fracture of the bone or stripping of the bone thread that was cut into the fibula/tibia by the screw.
10) With the first screw in place repeat the procedure above to insert a second screw approximately 1cm proximal to the position of the first screw...i.e., make a guide depression with the tips of scissors, drill a hole angled to pass though the fibula into the tibia, and screw in the second bone screw in the axis of the drill hole.
11) Remove all the screws from your patient by unscrewing them and return the bone screws to the supply table container. Removal of the screws in this procedure is usually performed 3-4 months after the initial surgery when the patient has had time to heal and before the patient returns to full activity...but we won't wait that long.
The bone fixation limits motion at the tibiofibular syndesmosis which, when a patient returns to full activity, would transfer excessive load/torque to the screws leading to their breakage. Removal of the screws allows the tibiofibular syndesmosis to move and flex normally.
Outcome:
A post-operative X-ray is taken to verify that the bony architecture of the ankle is in the correct orientation and that the fixation screws are correctly positioned through the fibula and tibia

The screws successfully correct the instability of the ankle joint and allow both the fibular bone and the tibiofibular ligaments to heal. The patient returns for removal of the screws prior to returning to full weight-bearing activities .