Clinical Exercise: Medial Malleolar Fixation
Scenario:
An individual was window cleaning their house on a 10' ladder and slipped, landing on garden stones as they fell off the ladder. They experienced immediate ankle pain and difficulty bearing weight. Thinking they had a simple sprain the individual took over the counter analgesics, applied ice, and elevated the leg through the day into the night. The next morning the deep aching pain in their ankle was worse and any movement of the foot elicited a high degree of pain. They present to the emergency department where x-rays are obtained.
Diagnosis:
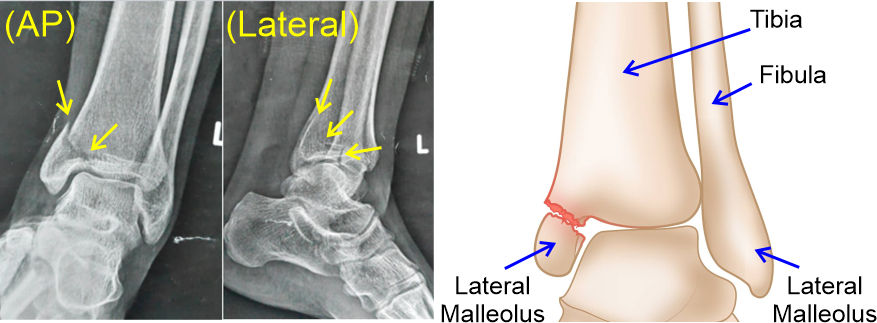
The x-ray imaging shows that the patient has a displaced fracture of their medial malleolus (i.e. fracture of the distal tibia at the malleolus).
The AP plate shows a clear oblique fracture through the malleolus with a medial displacement of the distal segment. The lateral film shows the fracture runs obliquely involving principally the posterior part of the malleolus. If the medical team had any concern with localization of the fracture, a CT could be ordered which would provide full 3D view of the injured bones.
You recognize that an unstable malleolus needs surgical fixation. Two possible approaches are commonly used for medial malleolus fixation, closed reduction with percutaneous fixation (CRPF) and open reduction with internal fixation (ORIF). CRPF involve reduction through the skin (movement of the broken segment back into position by manipulation through the skin) and then a minimal penetration hole to insert internal fixation screws (i.e. percutaneous). ORIF approach involves a skin incision sufficient to observe the broken segment followed by open reduction (movement of the broken segment back into position with instruments through the incision) and then internal fixation with screws. If a plate were needed in addition to screws, that can only be installed via an open procedure.
In this patient, the edema and hematoma during the 24 hours since the injury has swollen the soft tissues of the ankle. This would make it difficult to achieve an accurate closed reduction as the swollen tissue could be overly firm for easy manipulation and reduction. Therefore, you decide on an open reduction with internal fixation approach.
Mechanism:
The ankle joint (talocrural) is stabilized by the bony architecture of the lateral and medial malleoli along with the lateral and medial ligament complexes. A displaced fracture of the medial malleolus would destabilize this bony architecture as well as the function of any ligaments connected to the broken fragment. If left to heal by itself, the arrangement of the healed bone may be displaced and a permanent reduction in ankle stability or range of motion occur.
To ensure best outcome fixation is preferable. Fixation can be achieved by insertion of screws through the distal segment into the tibia to hold the bones in position while they heal. Depending on the injury, a metal plate may also be utilized.
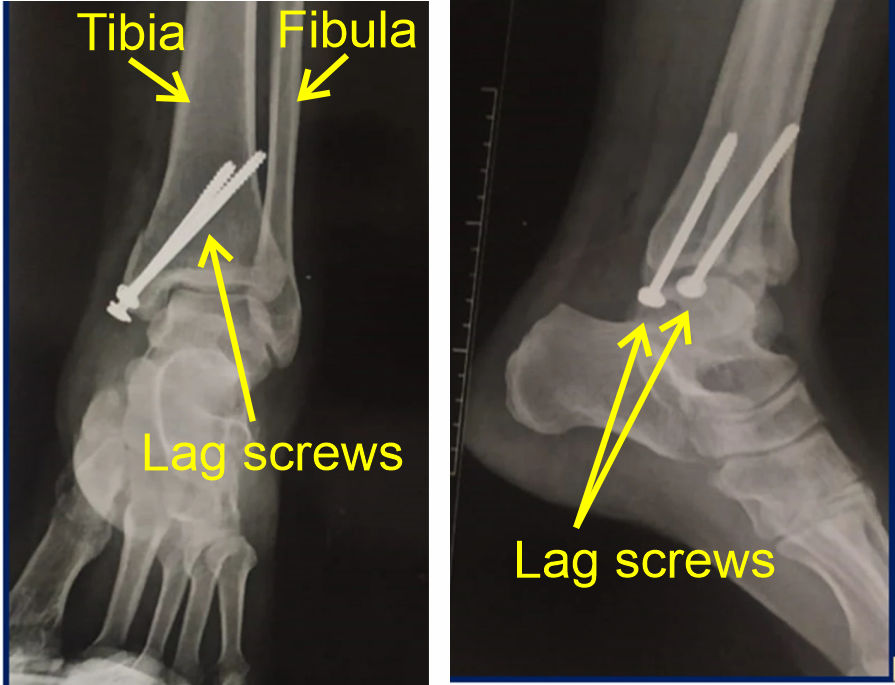
In this injury, you make the determination that two bone lag screws spanning the broken segment at the ankle will be sufficient to fixate the bone for healing.
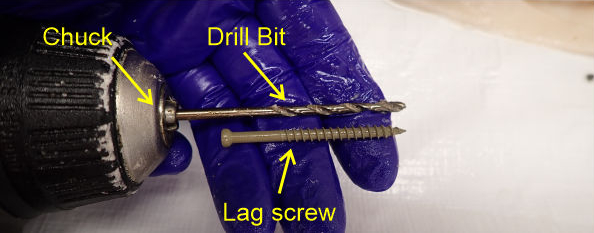
Lag screws have a threaded region near the tip and a smooth shaft region near the head of the screw. As a lag screw is inserted, the thread advances into the main bone pulling the head of the screw (and thus the distal bone fragment) towards the main bone. The smooth shaft region of the lag screw prevents any thread hold in the distal bone fragment so that it can be pulled smoothly into position. The length of the threaded/smooth regions of the screw shaft must match the fracture so that the threaded part of the screw lies entirely within the main bone.
Treatment (perform these steps on the donor in a mock-procedure):
PREPARATION: Send a member of your team to the instrument supply tables to fetch four bone lag screws and a purple skin surgical marker. Perform the procedure on both ankles, inserting two screws in each ankle, such that each member of your team has the opportunity to drill and insert one of the screws in your patient.
1) Switch the Stryker saw cutting head to the drill head
To change the power cutter head, press in the indented tabs on each side of the base of the cutting head and then pull the main handle part of the tool, separating the cutting head from the handle. Then place the drill head onto the handle and push in until the tabs on each side engage.

2) Insert the drill bit such that the chuck grips about 5mm of the drill bit and tighten. Check the length of the lag screw and make a note of how far the hole must be drilled to match the length of the lag screw (i.e. so you do not 'over-drill' the depth of the hole though the bone).
3) Place a wood block under the ankles to elevate the ankle.
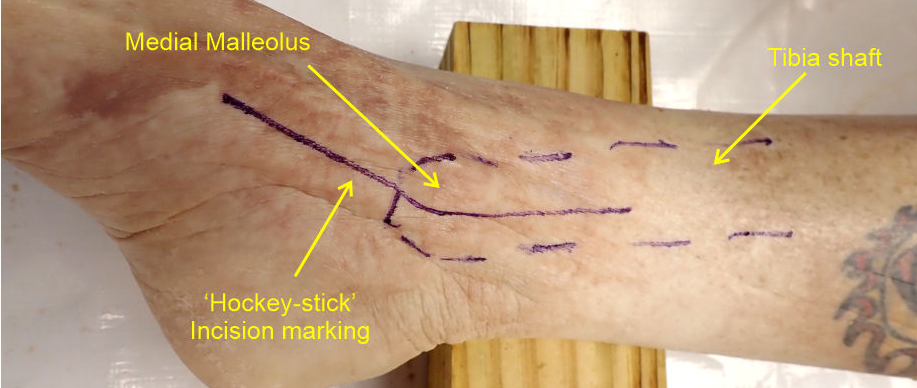
4) Palpate the medial side of the ankle and draw a line outlining the medial malleolus and tibial shaft.
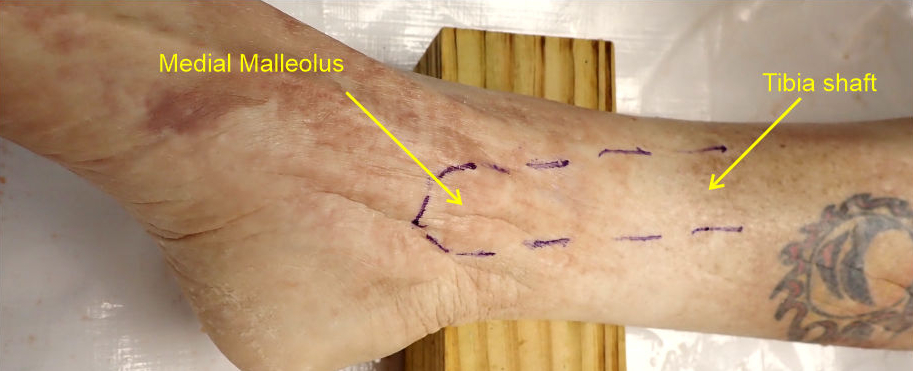
4) Mark the planned incision line on the malleolus with a angled incision that extends ~5-8cm proximally from the malleolus overlaying the tibia and ~5-8cm distally angled to run longitudinally along the medial edge of the foot (i.e. over the navicular bone).
This creates a 'hockey-stick' style incision about 10-15cm long centered on the medial malleolus. Most incisions for this procedure are 5-10cm in length, however we are utilizing a larger incision for improved access due to the rigidity of embalmed tissue.
4) Make an incision through the skin along your marked line and spread the incision widely using a Weitlaner retractor.
You may need to blunt dissect into the subcutaneous tissue to spread the skin if it is tightly adherent to the underlying tissues.

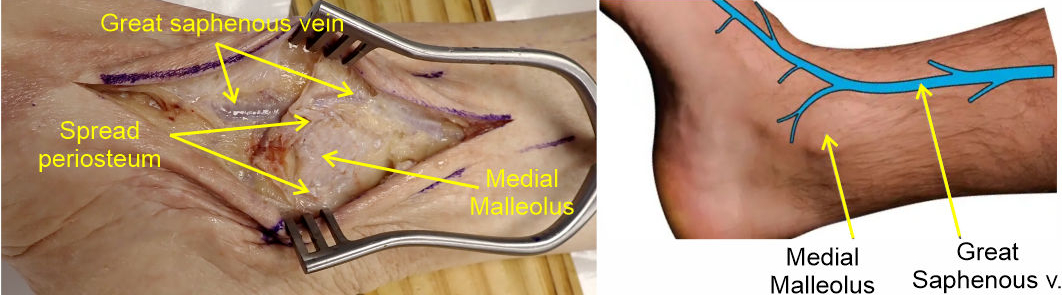
5) Make an incision through the periosteum (fascia covering the bone) and peel the sheet back to expose the inferior aspect of the medial malleolus.
The great saphenous and veins of the dorsal venous arch course just anterior to the medial malleolus. As you spread the incision and open the periosteum you may observe part of this vein anterior to the malleolus.
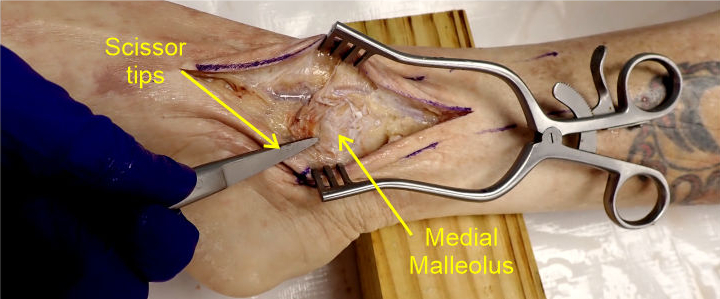
6) Place the closed tips of a pair of sharp point scissors against the bone of the tibia near the posterior side of the malleolus where the simulated fracture is located and press firmly against the bone while rotating the scissors in a back-forth screwing motion to cut (i.e. hand drill) a small depression into the bone surface.
You only need to make a small depression in the bone as this will keep the drill bit from slipping when you start to drill the guide hole below.
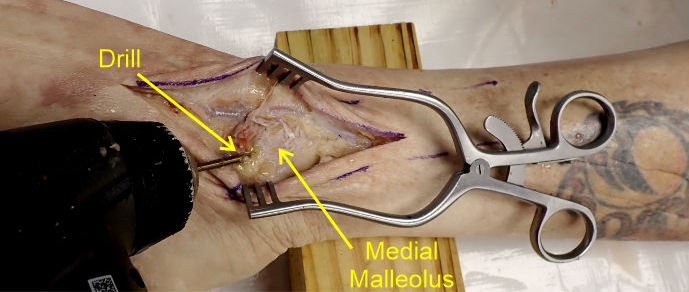
7) Position the drill bit against the depression point and angle the drill such that it aims superiorly and roughly parallel to the surface of the flared tibia at the malleolus.
This angle can also be estimated by palpating for the position of the tibial shaft as it flares into the medial malleolus. That allows you to angle the drill bit accurately paralleling the cortical bone of the distal tibia.
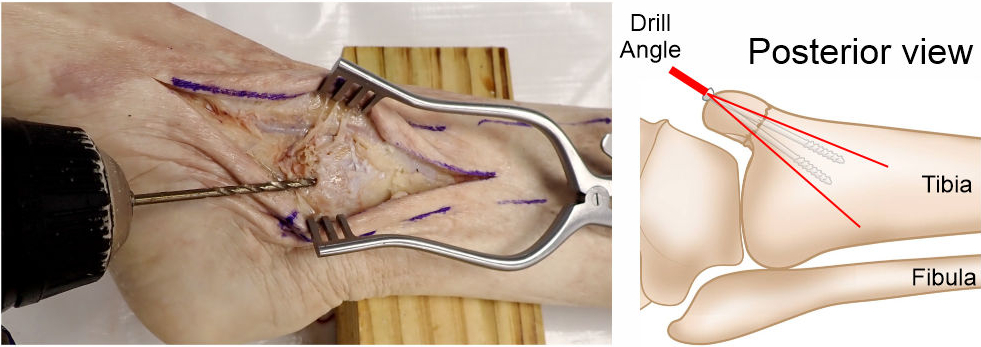
8) Drill a hole to a depth matching the length of the lag screw you are using.
We are using an average length which may be a little longer or a little shorter than ideal for every donor, but are suitable for demonstrating the principle and general approach used with the procedure.
Drilling a guide hole, which has a diameter matching that of the smooth region of the lag screw, minimizes orthogonal stresses on the bone and radial fracture risk during insertion of a screw.
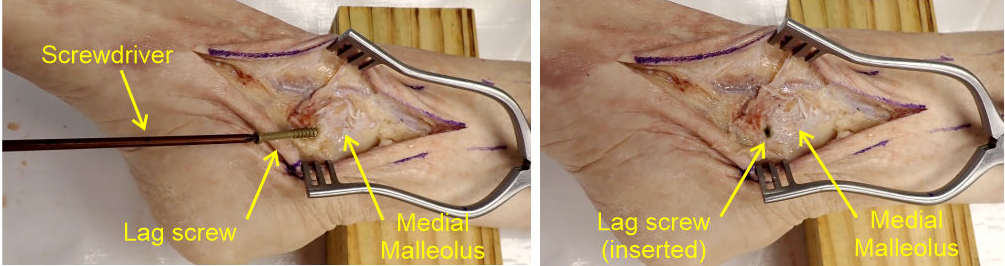
9) Position the screw angled to match the angle of the guide hole and using the Torx screwdriver (in the large/special tools draw) fully insert the screw.
The drill hole will guide the screw into the correct angle as long as the screw is roughly aimed along the hole axis. The bone screw should be tightened to be 'snug' against the malleolus bone, but not over-tightened as this can result in fracture of the thin malleolar bone or cracking of the groove in the bone cut by the screw thread.
If there is concern about the cortical bone strength in a patient, a washer is used to protect the cortical bone of the malleolus. A washer widens the surface area applied by the head of the screw and reduces cortical bone fracture risk.
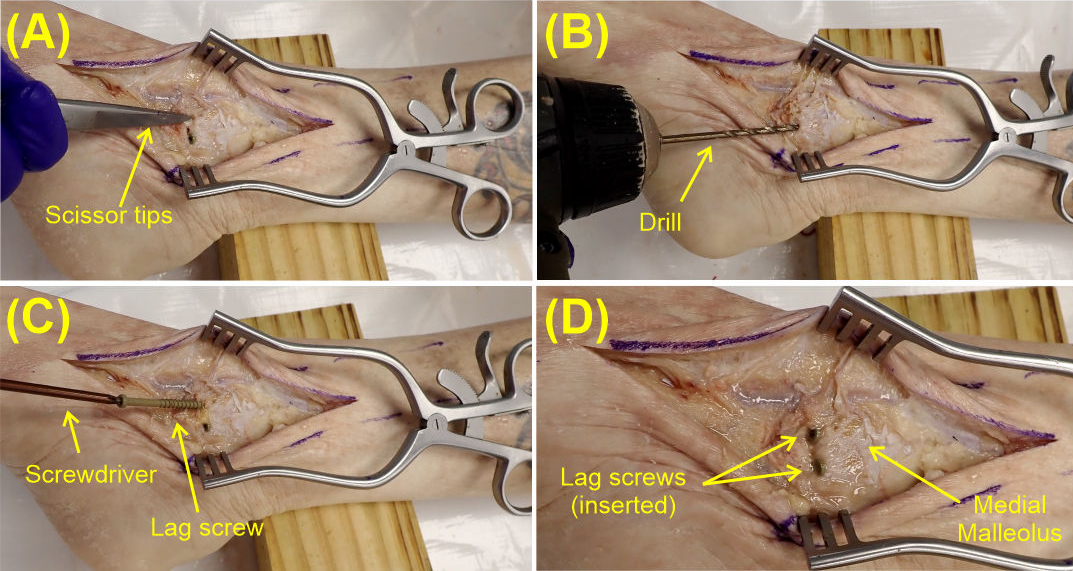
10) With the first screw in place repeat the procedure above to insert a second screw approximately 1cm anterior to the position of the first screw...i.e., (A) make a guide depression with the tips of scissors, (B) drill a guide hole angled in the tibia parallel to the first screw, and (C) insert in the second bone screw in the drill hole until it is snug to the malleolus bone (D).
11) Remove all the screws from your patient by unscrewing them and return the bone screws to the supply table container.
Removal of the screws in this procedure is uncommon, typically they are left in the patient long term. The primary reason for removal at a later time would be if the placement of the screws causes discomfort by the screw head rubbing against skin or tendons (e.g., the posterior tibialis tendon).
Outcome:
A post-operative X-ray is taken to verify that the fixation screws are correctly positioned through the broken fragment of the malleolus, aligning it correctly to the rest of the tibia. The screws successfully correct the instability of the ankle joint and allows the bone to heal. They are comfortably placed and the patient never needs them removed.